Wednesday, 15 July 2015

jBase5 Virtualized!

jBase5 Virtualized!

Goal: To prove that jBase5 online backup restored to Delphix can be run as virtualized database.
Result: Done! Restored files are working just fine.

Delphix Express ingested jBase database.

Nuts & Bolts

Testbed Components  
  • Delphix Express 4.2.3.1
  • jBase 5.2.13
  • CentOS release 6.6 (Final) - VM
Database Host Configuration
  • jbaseadm user created
  • jBase installed in /opt/jbase5/5.2.13 from jbaseadm user
  • /home/jbase5 - database files folder
jBase Configuration
  • System dictionary created in /home/jbase5 { CREATE-FILE DICT SYSTEM 11 }
  • Account created in /home/jbase5/PLAY { CREATE-FILE DICT MD 29 }
  • Account added to System file { JED SYSTEM PLAY }
001 D
002 /home/jbase5/PLAY
    03 - 19 lines are null
020 ESYSTEM_START
021 jbase
022 /home/jbase5/PLAY
    23 - 27 lines are null
028 /home/jbase5/PLAY/MD]D
    29 - 36 lines are null
037 ESYSTEM_END
  • Some test files taken from /opt/jbase5/5.2/samples/SQL and moved to PLAY account folder
  • Environment variables configured

Scala Test Program

I have decided to test if database is working fine using simple Scala program. Program is connecting to jBase instance using JDBC interface and selecting some data from MYCUSTS database file.

Test Program Source

#!/bin/sh
exec scala -Dorg.slf4j.simpleLogger.logFile=../logs/jbase_jdbc_test_$(date "+%Y.%m.%d-%H.%M.%S").log -Dorg.slf4j.simpleLogger.showDateTime=true -Dorg.slf4j.simpleLogger.dateTimeFormat="yyyy-MM-dd HH:mm:ss.S" -classpath "/opt/jbase5/5.2.13/java/lib/jbasejdbc.jar:../lib/slf4j-api-1.7.12.jar:../lib/slf4j-simple-1.7.12.jar:../lib/scala-logging_2.11-3.1.0.jar" "$0" "$@"
!#

println("jbase5 jdbc test")
println("Args: ")
args.foreach(println)
println("--")

import java.sql.{Connection, DriverManager, ResultSet, Date};
import java.util.{Calendar, Properties};
import com.typesafe.scalalogging.{Logger};
import org.slf4j.{LoggerFactory};

val logger = Logger(LoggerFactory.getLogger("jbase5_jdbc_test"))
val conn_str = "jdbc:jbase:thin:@localhost:20002/PLAY"
Class.forName("com.jbase.jdbc.driver.JBaseJDBCDriver")
val conn = DriverManager.getConnection(conn_str)
try {
  val queryBv = "select * from MYCUSTS";
  val statement = conn.prepareStatement(queryBv);
  val rs = statement.executeQuery();
  val rsMetaData = rs.getMetaData();
  println("Qry: "+queryBv)
  println("Number of columns: " + rsMetaData.getColumnCount());

  for (i <- 1 to rsMetaData.getColumnCount()) println("Col"+i+": "+rsMetaData.getColumnName(i))

  var i = 0
  while(rs.next() && i<5) {
    println(rs.getString(1) + ", " + rs.getString(2) + ", " + rs.getString(3) + ", " + rs.getString(4) + ", " + rs.getString(5) + ", " + rs.getString(6) + ", " + rs.getString(7) + ", " + rs.getString(8) + ", " + rs.getString(9));
        i +=1
  }
}
finally {
    conn.close
}

Virtualization Test Plan

  1. Execute jBase background processes.
  2. Execute test program to see if we get data selected.
  3. Execute jbackup on /home/jbase5 folder
  4. Stop jBase background processes.
  5. Move original /home/jbase5 to backup location.
  6. Provision from Delphix empty vFiles folder and mount it in /home/jbase5
  7. Restore backup executing jrestore. After restore we have our jBase files inside Delphix Engine.
  8. Start jBase backgroud processes.
  9. Execute test program to see if we get data selected. If we get out test output we are successful!

Test Steps - Details

  • Execute jBase background processes.
$ jbase_agent -p 20002 -F -A account &
# cd /opt/jbase5/5.2
# . jbase_env.sh
# jlogadmin -a On
# jRLA -ib
Execute test program to see if we get data selected.
# sh jbase_jdbc_test.sh
jbase5 jdbc test
Args:

--
Qry: select * from MYCUSTS
Number of columns: 15
Col1: RECID
Col2: FIRSTNAME
Col3: LASTNAME
Col4: ADDR1
Col5: ADDR2
Col6: CITY
Col7: STATE
Col8: ZIP
Col9: HOMETEL
Col10: WORKTEL
Col11: EMAIL
Col12: HARDWARE
Col13: OS
Col14: SYSTEMTYPE
Col15: NUMUSERS
0000041, ALAN, COOPER, 10260 SW GREENBURG RD, #1020, SEATTLE, WA, 24358, (124) 555-1337
Execute jbackup on /home/jbase5 folder
# find /home/jbase5 -print | sort | jbackup -W -v > /tmp/jbase5_w.bak
Stop jBase background processes.

Move original /home/jbase5 to backup location.
# mv /home/jbase5 /home/jbase5_sav
Provision from Delphix empty vFiles folder and mount it in /home/jbase5


Restore backup executing jrestore. After restore we have our jBase files inside Delphix Engine.

cat /tmp/jbase5_w.bak | jrestore -v
Start jBase backgroud processes.
$ jbase_agent -p 20002 -F -A account &
# cd /opt/jbase5/5.2
# . jbase_env.sh
# jlogadmin -a On
# jRLA -ib
Execute test program to see if we get data selected.
# sh jbase_jdbc_test.sh
jbase5 jdbc test
Args:

--
Qry: select * from MYCUSTS
Number of columns: 15
Col1: RECID
Col2: FIRSTNAME
Col3: LASTNAME
Col4: ADDR1
Col5: ADDR2
Col6: CITY
Col7: STATE
Col8: ZIP
Col9: HOMETEL
Col10: WORKTEL
Col11: EMAIL
Col12: HARDWARE
Col13: OS
Col14: SYSTEMTYPE
Col15: NUMUSERS
0000041, ALAN, COOPER, 10260 SW GREENBURG RD, #1020, SEATTLE, WA, 24358, (124) 555-1337
Working!!!

Starting from this point we can make snapshots of our virtualized jBase files and use all Delphix vFiles functionality to enjoy DaaS.

Conclusion

  • Virtualizing jBase files seems to be straightforward and works very well.
  • We can enjoy jBase DaaS with Delphix Engine. 


Tuesday, 16 June 2015

Informix Virtual Cloning - Staging Architecture with Delphix

Informix Virtual Cloning - Staging Architecture with Delphix

Delphix can clone Informix instances. It works. However there are disadvantages of cloning the whole instance (binaries + storage). It works only with non root installations. Fortunately there is another way of virtual cloning of Informix. Cloning with staging instance. This time only the storage is cloned. This method has no "no root installation" limitation!

Staging Architecture

Informix Virtual Cloning - Staging Architecture.

The general idea is that this time we are not cloning everything but only storage.
The picture above shows the architecture. We have:
  • Host Informix 1 - Source Informix installation ("root" or "non root") using physical storage
  • Host Informix 2 - Staging Informix non root installation. Storage is provided by Delphix Engine.
  • Host Informix 3 - Virtual Clone non root installation. Storage is provided by Delphix Engine.

 Staging Advantages

  • We are using staging instance with storage provided by Delphix to maintain a "master" copy of data files for our virtual clones.
  • There are several ways of feeding staging instance with data. We can feed it with full system archives every snapshot. We can use backups of logical logs or even HDR configuration.
  • Maintaining the stream of data from source instance does not affect operation of our virtual clone.
  • Source instance can be root or non root installation. To instantiate the staging instance we are using full system archive applied to not root installed staging instance.
  • Snapshots of staging are very lightweight when using logical logs or HDR as feed.
  • Independent life-cycle of staging and virtually cloned end instances.

Moving Parts - Mechanics

  • informix2-source_mock - Empty folder used to create dSource "informix2-source_mock".
  • informix2-storage - Staging instance storage. We are using vFiles as storage. At first the storage folder is empty.
Staging Informix Storage


  • At the beginning we have to restore source's system backup in storage instance. First we create empty files representing chunks from source instance. Then we are using "ontape -p" to reinstate Informix instance. Our new instance has different name than source and is installed in test VM. Staging instance is left running in "Fast Recovery" mode.
  • At this point we have to create first useful snapshot of our stage. We have to stop the instance using "onmode -ky" and then just create a snapshot of "informix2-storage" vFiles. Now we are ready to provision usable virtual clone of Informix.
  • informix3-storage - We need a third VM where Informix binaries are installed. We have to configure the instance in proper way and provide a storage for the instance. The storage is delivered by creating another vFiles folder "informix3-storage" out of "informix2-storage". This is done in third VM. After provisioning the storage we are ready to startup the virtual clone of Informix.
Informix Virtual Clone Storage


Informix Virtual Clone Storage Parameters
  • In order to startup virtual clone in Informix3 host we have to issue "oninit -PHY" and "onmode -m". From that point we can make snapshots of virtually cloned Informix, rewind to previous snapshots, refresh virtual clone from parent "informix2-storage" representing storage of staging instance. 
  • It is necessary to use pre-refresh and post-refresh hook scripts to stop and start Informix instance when refreshing. The same applies to rewind operation.
  • Every time we want to snapshot staging instance's storage we have to stop the instance and ingest new data from source. The procedure of ingesting data from system backups and logical logs is different. Logical logs can be ingested on the fly by invoking "ontape -l -C". We can use HDR if configuration allows.

Conclusion

  • Using staging architecture by cloning Informix is much more flexible than cloning full stack.
  • Serious limitation related to not root installations is removed.
  • Time flow of data coming from source instance is independent from virtual clone storage and has its own life-cycle.
  • Virtually cloned instances are not bound directly to source instance.
  • We can create multiple clones based on the same "virtual dSource". This can be done because of Delphix vFiles inheritance feature.
  • Such architecture is suitable for cloning big Informix databases. 

Resources

Git: https://github.com/goliasz/delphix-informix


Tuesday, 2 June 2015

Delphix can clone Informix instances

Informix Instance Cloning


Delphix can clone Informix! This post describes basic scenario of cloning Informix instances. It is a beginning of interesting journey.

Scenario

Host 1: Informix instance installed. Non root installation.
Host 2: Informix instance installation folder provisioned by Delphix. Little change to network configuration file and we can enjoy new running Informix instance. We can use snapshot, refresh and rewind functionality. Using these features we can travel in time with our cloned instance.

Architecture

Informix Instance Basic Cloning Architecture

Delphix Engine 4.2.2.1
Functionality used: Unstructured Files 

Host 1 - Details

Delphix: Source Host
OS: CentOS release 6.6 (Final)
Name: informix1.kolibero.local

Informix:
  • Installation Folder: /home/informix/ixinst1
  • Version:  IBM Informix Database Server 12.10.FC5 PRODUCT RELEASE (Delevoper Edition)
  • Installation Type: non root
  • Instance name: ol_informix1210
  • Custom Database: Blog
  • Custom Table: Blog

Host 2 - Details

Delphix: Target Host
OS: CentOS release 6.6 (Final)
Name: informix2.kolibero.local 

Cloning Steps

  • Install Host 1 VM
  • Install Informix IDS from installation media. Installation folder /home/informix/ixinst1. This is non root installation.
  • Start Informix instance. Create Blog database. Create Blog table inside database.
  • Install Host 2 VM.
  • Register source and target environments in Delphix.

Source host registered in Delphix
Target host registered in Delphix
  •  Ingest /home/informix/ixinst1 folder as dSource.
Source Informix installation folder ingested into Delphix
  •  Clone ingested instance folder to target Host 2.

Cloned Informix instance folder. Now available in target Host 2.
  • Modify /home/informix/ixinst1/etc/sqlhosts.ol_informix1210 in Host2 to point to new host name. We have to modify informix1.kolibero.local to informix2.kolibero.local.
[informix@informix2 etc]$ more sqlhosts.ol_informix1210
ol_informix1210 onsoctcp informix2.kolibero.local 16323
dr_informix1210 drsoctcp informix2.kolibero.local 22217
lo_informix1210 onsoctcp 127.0.0.1 33113
[informix@informix2 etc]$
  • Export instance's environment variables
  • Start cloned instance using oninit.
At this point we can use new cloned Informix instance. We can make snapshots of the instance, rewind its state back and forth.

Conclusion

  • This is very basic example of cloning Informix using Delphix but it is good starting point to more sophisticated scenarios.
  • Using basic Delphix functionality of cloning "Unstructured Files" we can create new independent environment serving Informix instance. Our cloned instance can enjoy time machine features offered by Delphix.


Tuesday, 28 April 2015

Command Line Cloning - Oracle R12.1.3 Example

Command Line Cloning

It's very simple to clone Oracle EBS R12.1.3 using Delphix command line interface.

Simple example. We have following data sources available:

Delphix - Disabled Oracle EBS Sources

Data sources:
  • VIS - Oracle database source data
  • VIS appsTier - EBS R12 application stack source
  • VIS dbTechStack - EBS R12 database binaries source
All the sources are greyed out which means that they are disabled and are not connected to the source EBS instance. Source EBS instance is down at this time and is not necessary to be up during provisioning process.

To create new totally independent Oracle EBS instance we just need to execute one command:

ssh delphix_admin@DOMAIN@192.168.1.32 < /home/delphixcli/VISDEV2_app.dx
The command is executing simple Delphix CLI script which is creating three virtual objects necessary to bring a new virtual EBS instance to life. The objects:
  1. VISDEV2 dbStack - new Oracle database binaries
  2. VISDEV2 - new database
  3. VISDEV2 appsTier - new application binaries
Delphix CLI cloning script (VISDEV2_app.dx):

database provision
defaults
set type=TimeflowPointSemantic
set location=LATEST_SNAPSHOT
set container="VIS dbTechStack"
commit
set container.name="VISDEV2 dbStack"
set container.group="Targets - EBS"
set source.parameters.appsPassword=apps
set source.parameters.display="ebstrg10:0.0"
set source.parameters.oracleHome="db/tech_st/11.1.0"
set source.parameters.targetSystemHostname="ebstrg10"
set source.parameters.targetSystemPortPool=1
set source.parameters.targetSystemSid="VISDEV2"
set source.parameters.targetSystemUtlFileDir="/var/tmp"
set source.name="VISDEV2 dbStack"
set sourceConfig.name="VISDEV2 dbStack"
set sourceConfig.path="/data/u01/oracle/VISDEV2"
set sourceConfig.repository="ebstrg10.kolibero.local/builtin:ebs-db"
commit

database provision
defaults
set type=TimeflowPointSemantic
set container="VIS"
set location=LATEST_SNAPSHOT
commit
set container.name=VISDEV2
set container.group="Targets - EBS"
set source.mountBase="/data/u01/oracle/data2"
set sourceConfig.type=OracleSIConfig
set sourceConfig.databaseName=VISDEV2
set sourceConfig.uniqueName=VISDEV2
edit sourceConfig.instance
set instanceNumber=1
set instanceName=VISDEV2
back
set sourceConfig.repository="ebstrg10.kolibero.local/'/data/u01/oracle/VISDEV2/db/tech_st/11.1.0'"
commit

database provision
defaults
set type=TimeflowPointSemantic
set location=LATEST_SNAPSHOT
set container="VIS appsTier"
commit
set container.name="VISDEV2 appsTier"
set container.group="Targets - EBS"
set source.name="VISDEV2 appsTier"
set source.parameters.appsPassword=apps
set source.parameters.display="ebstrg20:0.0"
set source.parameters.commonTop="apps/apps_st/comn"
set source.parameters.instTop="/data/u01/oracle/VISDEV2_inst"
set source.parameters.oracleHome="apps/tech_st/10.1.3"
set source.parameters.targetSystemDatabaseDomainName="kolibero.local"
set source.parameters.targetSystemDatabaseServerNode="ebstrg10"
set source.parameters.targetSystemHostname="ebstrg20"
set source.parameters.targetSystemPortPool=1
set source.parameters.targetSystemSid="VISDEV2"
set sourceConfig.name="VISDEV2 appsTier"
set sourceConfig.path="/data/u01/oracle/VISDEV2"
set sourceConfig.repository="ebstrg20.kolibero.local/builtin:ebs-app"
commit
Execution of the script takes 14 minutes and new EBS life is born.

Delphix - New EBS virtual target objects created


New EBS R12.1.3 Life

Conclusion

  • It is very easy to prepare Delphix CLI script to clone EBS environments
  • The script is self documenting
  • The script can be adjusted for automation

Update, 2015-12-11
Current fixed version of scripts available on GitHub here: https://github.com/goliasz/delphix-cli-ebs

Wednesday, 22 April 2015

Oracle EBS R12.1.3 - Virtualizing Experience


Oracle's ERP Goes Virtual

Some time ago I discovered in marketing materials that Delphix is capable of virtualizing Oracle EBS. From that moment I wanted to test it myself. Let us test it!

Test Enviroment Architecture

We need:
  1. Source Oracle EBS R12.1.3 environment.
  2. Delphix Engine v.4.2.1.
  3. 2 target VM to host database and application node.

I have decided to install source R12.1.3 in one VM running in ESX5.5. Both database and application node will share the same VM host. This is to conserve some resources. We do not need great performance of source R12.1.3 since we are only using it as a source for virtualizing and cloning. I have installed EBS from scratch in VM running Oracle Enterprise Linux 6.4 (Santiago). Installation was done in two steps. First installation of R12.1.1 from media available in Oracle e-delivery and then patching up to R12.1.3. This was quite challenging for me but eventually I have succeeded. This was Vision Demo installation.

I have chosen most recent version of Delphix Engine v4.2 for test. It supports virtualizing Oracle EBS R11i, R12.1 and R12.2. This time we are testing R12.1.3. In one of the next posts I am going to show how it goes with R12.2. Delphix is running as VM in ESX5.5.

We need target VMs to host our database and application stack of R12.1.3. I have decided to use also Oracle Enterprise Linux 6.4 for this.

VM Sizing

Source VM - Source EBS
- 8GB RAM
- 4 vCores
- 16 GB Swap
- 20 GB - system partition
- 600 GB - partition dedicated to EBS R12.1.3 (used for db and apps binaries, database and installation media)

Target VM - Database Tier Node
- 4GB RAM
- 2 vCores
- 16GB - Swap
- 20GB - System Partition

Target VM - Application Tier Node
- 8GB RAM
- 4 vCores
- 16 GB - Swap
- 20GB - System Partition

Source EBS Instance

Delphix GUI - Capacity Management Screen
Delphix after importing of EBS source objects into applience's storage is reporting:
- source database takes 186.99 GB
- database stack takes 53.94 GB
- application stack takes 28.07 GB

EBS binaries plus database files occupy 269 GB disk space in source VM.

Source VM reports following
Space Occupation in Source VM

Folder data keeps not only EBS files but installation media too.


Target Instance Nodes

Database Tier Target VM
Space Occupation - Target VM - Database Tier
We can see in screenshot above that there is only 3.6GB occupied in our system partition. The mounted resources are managed by Delphix Engine. DE delivers database binaries and database files this way. No Oracle binaries are installed in this VM.
We can see that there are "appdata_container" and "oracle_db_container" folder names over there. They indicate what kind of resources are mounted on target VM.

Space occupied by target VM - Apps Tier


Application Tier Target VM
In screenshot above we can see that we occupy in system tablespace only 3.6GB. We also have one network resource mounted from Delphix Engine. These are just application tier binaries managed by DE.

Virtualizing Process

Clonig approach is very well described in Ron Enkins's blog posts:

http://blog.delphix.com/ron/2014/09/10/virtualsing-oracle-ebs-r12-1/
http://blog.delphix.com/ron/2014/10/08/creating-virtual-oracle-ebs-environment-using-delphix/ 
It consists of two phases
1. Creating data sources
2. Virtualizing/Cloning

Both phases consist of three steps.

Data sources - one time process
1. Create database stack data source - ingest database binaries and EBS database related stuff
2. Create Oracle database data source - ingest database itself
3. Create application stack data source  - ingest application binaries and related data


Virtualizing/Cloning - Virtual EBS Components
1. Create virtual database stack - binaries. It is done by mounting network resource containing virtual database binaries. It is mounted in target database VM. After mounting listener process is started.
2. Create VDB (Virtual Database) in target database VM. Startup database using virtual binaries.
3. Create virtual application stack in target app stack VM. Mounting binaries from Delphix Engine. Startup of binaries.

All these steps are done in just few clicks. It's described in detail in Ron's blog posts mentioned above.

Delphix Main Console - EBS Objects
In screen above we can see:
VIS - data source for Oracle database VIS
VIS dbTechStack - data source containing Oracle database binaries and database server related data in EBS
VIS appsTier - data source containing application binaries and apps related data

VISDEV dbStack - virtual database binaries mounted to and running in database node VM
VISDEV - virtual database opened in database node VM
VISDEV appsTier - virtual application binaries mounted to and running in application node VM

Virtual means
  • We don'd need space in target VMs
  • We only need computing power in target VMs
  • We can multiply all virtual objects endlessly. The only limit is computing resources in target VMs.
  • We can use all amazing Delphix features like snapshots, rewind, refresh from source, time flow etc etc


Database Stack Card

Virtual Database Card


Application Tier Card


Delphix'ed EBS Login Screen


Inside Virtual EBS

Virtual VISDEV EBS R12.1.3


Conclusion

Timing
  1. Provisionig of virtual database stack - 3 minutes
  2. Provisioning of VDB - 3 minutes
  3. Provisioning of virtual application stack - 11 minutes

You can have running virtual copy of fully functional Oracle EBS R12.1.3 in 17 minutes. This is timing in my small lab box.

You don't need vast resources at target nodes to run your virtual EBS.

You can do it without expect knowledge. Once source EBS instance is ingested into Delphix Engine and your target VMs are properly prepared (one time action) you can do it in just few clicks in Delphix Web GUI.

Imagine what you can do with such capabilities.
  • EBS patching and regression tests are getting safe and can be done in parallel with other projects. No collisions with release activities.
  • Production bugs can be tested against system state when the problem happened - time flow feature of Delphix data sources
  • You can run parallel projects in isolated environments
 

Sunday, 29 March 2015

KonaKart Community Edition virtualized by Delphix Landshark 2.0

KonaKart virtualized!


Delphix capability to virtualize applications is amazing!

After some brainstorming I've decided to try to use Delphix Landshark Demo 2.0 to virtualize e-commerce application.

What is KonaKart?

KonaKart is enterprise e-commerce java application. It is adopted by companies that are very well recognizable. See here: http://www.konakart.com/customers/


Sample Screenshot from KonaKart Community edition.

The idea behind

Let us imagine we want to create test/development numerous instances of KonaKart application with almost no storage and time cost. We want to create, synchronize and destroy test instances on demand in seconds.
Delphix can do this with various databases, flat files and such big fishes like Oracle's e-Business Suite. Why not just KonaKart?

How to do this?

We can virtualize KK in 2 ways.
  1. Use flat files virtualizing capability and prepare hook scripts to do some post provisioning actions after virtual application instance is created.
  2. Create our own toolkit doing everything behind the scenes. This is something similar like shown here Landshark 2.0 Employee Web App Virtualization.
Let us get bold and do our own toolkit.

Testbed preparations

We need an source application to virtualize. I've decided to install KonaKart Community Edition in new schema "konakart" in linuxsource.delphix.local host. The host is available as a part of Delphix Landshark 2.0 Demo. It consists of Delphix Engine VM, linuxsource VM and linuxtarget VM. You can get it here.
Process of KonaKart installation is easy. You can get the installation files here. I've used "64′ Linux/Unix" zipped package. I've used existing ORCL Oracle 11g database available in linuxsource.delphix.local VM. After successful installation you should be able to run KK using a link similar to this http://linuxsource.delphix.local:8780/konakart.

Now we are ready to virtualize KK.

What does it mean to virtualize KK?

What do we want to do? We want to create a virtual copy of KonaKart on different host (aka linuxtarget.delphix.local). What is virtual copy? It is a NFS mounted directory in linuxtarget filesystem containing new copy of KK binaries. We want to reconfigure the new application so that it connects to new "virtual" database. Beside this we want to give it to testers and developer so we need to mask sensitive data in new virtual database.   

Steps to do


Very easy! We have everything thanks great job done by Adam Bowen from Delphix. He has prepared sample application toolkit we can use to create our own.
But first let us plan the steps that has to be performed by new toolkit. We want the toolkit to:
  1. Create a virtual copy of application binaries. 
  2. Mount the directory with copied binaries to target host (linuxtarget.delphix.local).
  3. Reconfigure the application so that it connects to new virtual database.
  4. Mask sensitive data in virtual database i.e. application users, password etc. etc.
  5. Start the virtual application
That is all we need to do to have brand new working KK.

How to create new toolkit?

Let us take a look at existing example Adam has prepared for us. We can find it in linuxtarget VM /home/delphix/webapp.json

If we look inside we can easily understand how does it work! But firs we need to reformat it to make it better readable. I'm using http://jsonformatter.curiousconcept.com/ to make it human readable :).

Beginning of formated webapp.json
webapp.json contains following sections
  • name
  • type
  • stop
  • start
  • snapshot
  • prettyName
  • provision
  • provisionParameters
  • statusScript
To prepare our own toolikit we have to create new json file with modified sections
  • name
  • stop
  • start
  • prettyName
  • provision
  • provisionParameters 
name - just add new name of the toolkit
prettyName - new name visible in Delphix GUI
provisionParameters - here we have to decide what paremeters we need to accomplish our goals. I needed some additional parameter ORACLE_HOME. This parameter was necessary to execute sqlplus from the script embeded in start and provision section.
stop, start, provision - contain embedded shell scripts that get executed when virtual application gets provisioned, started or stopped.

I've created my own konakartapp.json file with custom embedded scripts implementing my logic described above in "Steps to do".
Part of my konakartapp.json file.
  

How to register toolkit definition in Delphix?

Very easy! Again thanks to Adam. We just need to modify script webapp_toolkit_installer.sh or create our own. We just have to upload our new json file.
Contents of webapp_toolkit_installer.sh
 After executing our new toolkit installer we have our toolkit ready to use.

Showtime

Now we can see our toolkit in Delphix.
Now we can choose KonaKart-Application-ORA as new data set.
We can create a data set of KonaKart-Application-ORA and dSource. This is Delphix representation of our source KK instalation.
KonaKart dSource is ready to use.

When dSource is ready we can provision our virtual KonaKart application. 

Now it's time to provision new virtual KK.

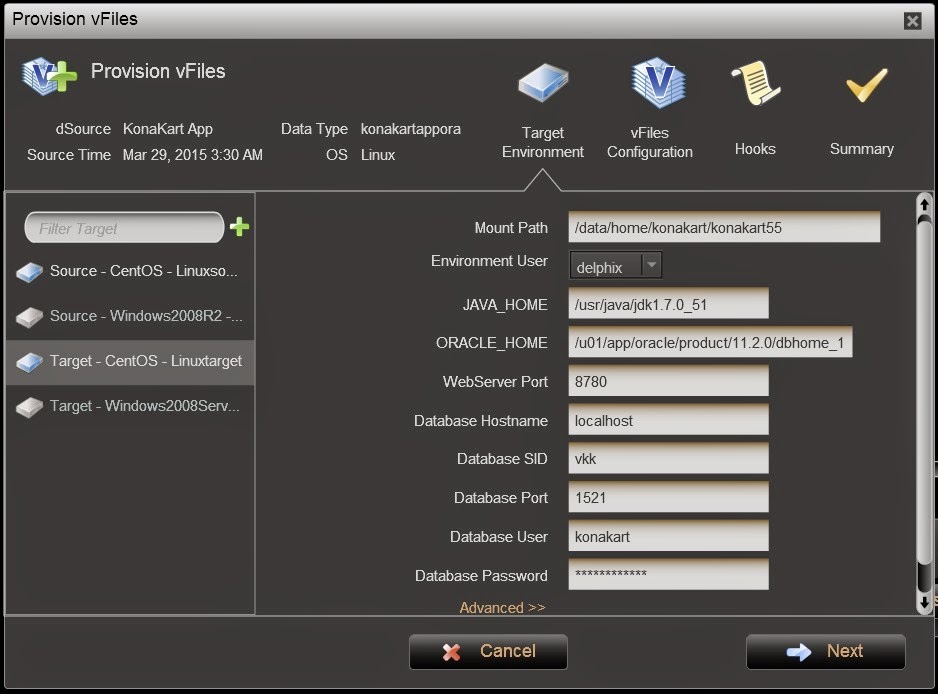
First step by provisioning. We are filling in parameters of provisioning KK application.
Now formality. Name of our new KK application in Delphix Engine.
Just summary of our settings and let's go! Make it real!
30 seconds of wait time and we have new KonaKart up and running. Ready to use!
New virtual instance of KonaKart application ready to use!

Conclusion

Delphix has amazing capabilities! The ability to virtualize whole application stacks is unique and very powerful. You can have a bunch of virtual applications in just few clicks, in just a minute and almost with no additional storage cost.